How to Build and Deploy a Blog-to-Audio Service Using OpenAI
Turning written blog posts into audio is a simple way to reach more people.
\ Many users prefer listening during travel or workouts. Others enjoy having both reading and listening options.
\ With OpenAI’s text-to-speech models, you can build a clean service that takes a blog URL or pasted text and produces a natural-sounding audio file.
\ In this article, you will learn how to build this system end-to-end. You will learn how to fetch blog content, send it to OpenAI’s audio API, save the output as an MP3 file, and serve everything through a small FastAPI app.
\ At the end, we will also build a minimal user interface and deploy it to Sevalla so that anyone can upload text and download audio without touching code.
Understanding the Core Idea
A blog-to-audio service has only three important parts.
\ The first part takes a blog link or text and cleans it. The second part sends the clean text to OpenAI’s text-to-speech model. The third part gives the final MP3 file back to the user.
\ OpenAI’s speech generation is simple to use. You send text, choose a voice, and get audio back. The quality is high and works well even for long posts. This means you do not need to worry about training models or tuning voices.
\ The only job left is to make the system easy to use. That is where FastAPI and a small HTML form help. They wrap your code into a web service so anyone can try it.
Setting Up Your Project
Create a folder for your project. Inside it, create a file called main.py. You will also need a basic HTML file later.
\ Install the libraries you need with pip:
pip install fastapi uvicorn requests beautifulsoup4 python-multipart
\ FastAPI gives you a simple backend. The Requests module helps download blog pages. BeautifulSoup helps remove HTML tags and extract readable text. Python-multipart helps upload form data.
\ You must also install the OpenAI client:
pip install openai
\ Make sure you have your OpenAI API key ready. Set it in your terminal before running the app:
export OPENAI_API_KEY="your-key"
\ On Windows, you can do:
setx OPENAI_API_KEY "your-key"
Fetching and Cleaning Blog Content
To convert a blog into audio, you must first extract the main article text. You can fetch the page with Requests and parse it with BeautifulSoup.
\ Below is a simple function that does this.
import requests from bs4 import BeautifulSoup def extract_text_from_url(url: str) -> str: response = requests.get(url, timeout=10) html = response.text soup = BeautifulSoup(html, "html.parser") paragraphs = soup.find_all("p") text = " ".join(p.get_text(strip=True) for p in paragraphs) return text
Here is what happens step by step.
\
- The function downloads the page.
- BeautifulSoup reads the HTML and finds all paragraph tags.
- It pulls out the text in each paragraph and joins them into one long string.
- This gives you a clean version of the blog post without ads or layout code.
\ If the user pastes text instead of a URL, you can skip this part and use the text as it is.
Sending Text to OpenAI for Audio
OpenAI’s text-to-speech API makes this part of the work very easy. You send a message with text and select a voice such as Alloy or Verse. The API returns raw audio bytes. You can save these bytes as an MP3 file.
\ Here is a helper function to convert text into audio:
from openai import OpenAI client = OpenAI() def text_to_audio(text: str, output_path: str): audio = client.audio.speech.create( model="gpt-4o-mini-tts", voice="alloy", input=text ) with open(output_path, "wb") as f: f.write(audio.read())
\ This function calls the OpenAI client and passes the text, model name, and voice choice. The .read() method extracts the binary audio stream. Writing this to an MP3 file completes the process.
\ If the blog post is very long, you may want to limit text length or chunk the text and join the audio files later. But for most blogs, the model can handle the entire text in one request.
Building a FastAPI Backend
Now, you can wrap both steps into a simple FastAPI server. This server will accept either a URL or pasted text. It will convert the content into audio and return the MP3 file as a response.
\ Here is the full backend code:
from fastapi import FastAPI, Form from fastapi.responses import FileResponse import uuid import os app = FastAPI() @app.post("/convert") def convert(url: str = Form(None), text: str = Form(None)): if not url and not text: return {"error": "Please provide a URL or text"} if url: try: text_content = extract_text_from_url(url) except Exception: return {"error": "Could not fetch the URL"} else: text_content = text file_id = uuid.uuid4().hex output_path = f"audio_{file_id}.mp3" text_to_audio(text_content, output_path) return FileResponse(output_path, media_type="audio/mpeg")
\ Here is how it works. The user sends form data with either url or text. The server checks which one exists.
\ If there is a URL, it extracts text with the earlier function. If there is no URL, it uses the provided text directly. A unique file name is created for every request. Then the audio file is generated and returned as an MP3 download.
\ You can run the server like this:
uvicorn main:app --reload
\ Open your browser at http://localhost:8000. You will not see the UI yet, but the API endpoint is working. You can test it using a tool like Postman or by building the front end next.
Adding a Simple User Interface
A service is much easier to use when it has a clean UI. Below is a simple HTML page that sends either a URL or text to your FastAPI backend. Save this file as index.html in the same folder:
<!DOCTYPE html> <html> <head> <title>Blog to Audio</title> <style> body { font-family: Arial, padding: 40px; max-width: 600px; margin: auto; } input, textarea { width: 100%; padding: 10px; margin-top: 10px; } button { padding: 12px 20px; margin-top: 20px; cursor: pointer; } </style> </head> <body> <h2>Convert Blog to Audio</h2> <form action="/convert" method="post"> <label>Blog URL</label> <input type="text" name="url" placeholder="Enter a blog link"> <p>or paste text below</p> <textarea name="text" rows="10" placeholder="Paste blog text here"></textarea> <button type="submit">Convert to Audio</button> </form> </body> </html>
\ This page gives the user two options. They can type a URL or paste text. The form sends the data to /convert using a POST request. The response will be the MP3 file, so the browser will download it.
\ To serve the HTML file, add this route to your main.py:
from fastapi.responses import HTMLResponse @app.get("/") def home(): with open("index.html", "r") as f: html = f.read() return HTMLResponse(html)
\ Now, when you visit the main URL, you will see a clean form.
When you submit a URL, the server will process your request and give you an audio file.
Great. Our text to audio service is working. Now, let’s get it into production.
Deploying Your Service to Sevalla
You can choose any cloud provider, like AWS, DigitalOcean, or others, to host your service. I will be using Sevalla for this example.
\ Sevalla is a developer-friendly PaaS provider. It offers application hosting, database, object storage, and static site hosting for your projects.
\ Every platform will charge you for creating a cloud resource. Sevalla comes with a $50 credit for us to use, so we won’t incur any costs for this example.
\ Let’s push this project to GitHub so that we can connect our repository to Sevalla. We can also enable auto-deployments so that any new change to the repository is automatically deployed.
\ You can also fork my repository from here.
\ Log in to Sevalla and click on Applications -> Create new application. You can see the option to link your GitHub repository to create a new application.
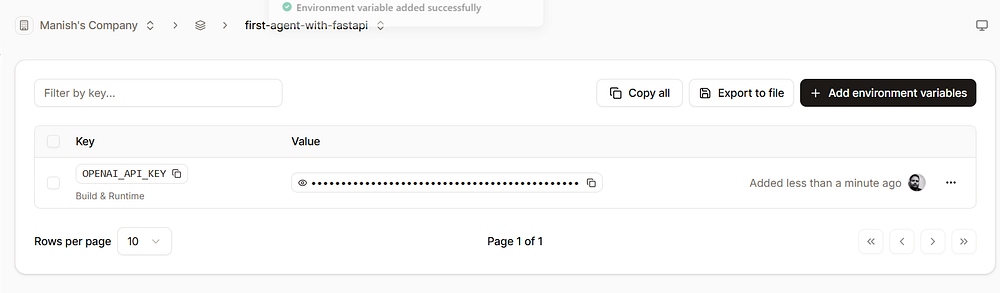
Use the default settings. Click “Create application”. Now, we have to add our openai api key to the environment variables. Click on the “Environment variables” section once the application is created, and save the OPENAI_API_KEY value as an environment variable.
\
Now, we are ready to deploy our application. Click on “Deployments” and click “Deploy now”. It will take 2–3 minutes for the deployment to complete.
\
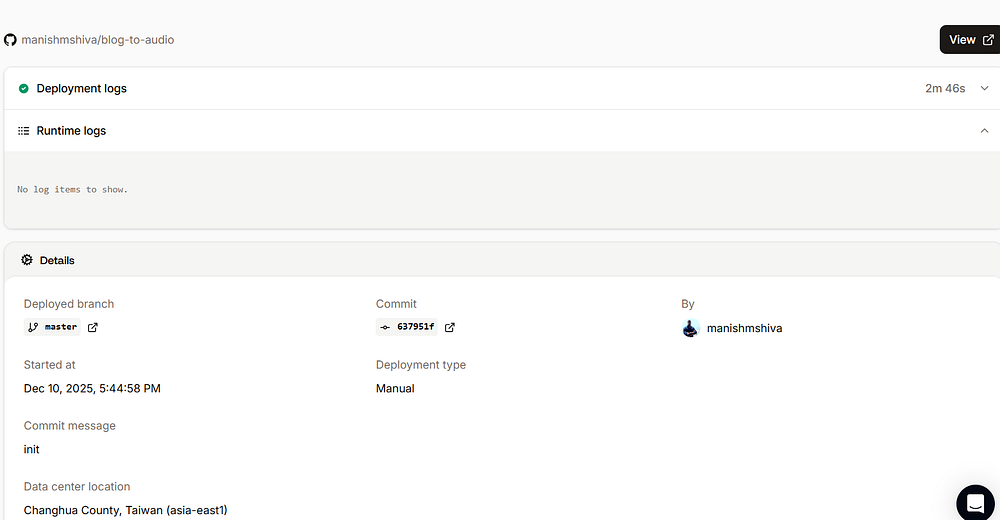
Once done, click on “Visit app”. You will see the application served via a URL ending with sevalla.app . This is your new root URL. You can replace localhost:8000 with this URL and start using it.
Congrats! Your blog-to-audio service is now live. You can extend this by adding other capabilities and pushing your code to GitHub. Sevalla will automatically deploy your application to production.
Conclusion
You now know how to build a full blog-to-audio service using OpenAI. You learned how to fetch blog text, convert it into speech, and serve it with FastAPI. You also learned how to create a simple user interface, allowing people to try it with no setup.
\ With this foundation, you can turn any written content into smooth, natural audio. This can help creators reach a wider audience, enhance accessibility, and provide users with more ways to enjoy content.
\ Hope you enjoyed this article. Sign up for my free newsletter, TuringTalks.ai, for more hands-on tutorials on AI. You can also visit my website.
\


You May Also Like

MyCroatianCharter places Croatia as leading destination for family luxury yacht charters in 2026

What Is “Real Pi”? Understanding Mainnet Migration and Ownership in Pi Network