The Ultimate Guide to SPL Tokens on Solana From An Actual Dev
\ Read this guide to understand SPL tokens and how to create and deploy your own SPL token on Solana, with explanations, examples, code and best practices.
\
https://youtu.be/K5gIybZ-uS4?embedable=true
Table Of Contents
- Prerequisite
- What are SPL Tokens?
- Types of SPL Tokens
- Create SPL Tokens
- Set Up Environment
- Create a Wallet on Solana
- Upload Metadata to IPFS
- Mint SPL Tokens
- Verify deployed Tokens
- Deploy SPL Token to Magic Eden
- Considerations
- Summary
\
Prerequisite
To follow this guide and successfully mint a Solana SPL token, you’ll need the following:
- Node.js: Version 16.15 or higher installed
- Familiarity with JavaScript/TypeScript
- Basic blockchain concepts
\
:::tip ✔ Verify your Node.js version by running node -v in your terminal. If it’s below 16.15, update it and confirm the new version.
:::
\
What are SPL Tokens?
\
:::tip ⚡️ If you are already familiar with Solana and SPL tokens and ready to dive into coding, jump to the " Create SPL Tokens” section below.
:::
\ SOL is Solana’s native token, used for transactions and governance. All other tokens, whether fungible or non-fungible (NFTs), are defined as SPL tokens.
SPL Token-2022 are used to create digital assets on the Solana blockchain, just like ERC-20 tokens on Ethereum. Defined by the Solana Program Library, SPL tokens support both fungible and non-fungible assets.
Solana’s ecosystem provides a foundation for SPL token development, supported by significant metrics:
https://x.com/arorautkarshini/status/1955988104004653429?embedable=true
Types of SPL Tokens
The Solana Program Library (SPL) supports a variety of token standards, defined by the Token Metadata program, to accommodate these diverse use cases. The Token Metadata program tracks a token’s fungibility using the Token Standard enum on the Metadata account.
\
-
Fungible
-
Simple SPL Tokens
-
Supply >= 0
-
Limited metadata (name, symbol, description, image)
-
Decimal points: ≥1 (e.g., 6 for USDC)
-
Eg: USDC
\
-
Fungible Asset
-
Semi-fungible tokens
-
Supply >= 0
-
Extended metadata, attribute-heavy
-
Decimal points: 0 (no divisibility beyond whole units)
-
Eg: Gaming items like a sword
\
-
NonFungible
-
Unique SPL Tokens
-
Supply = 1
-
Decimal points: 0 (indivisible, unique assets)
-
Eg: Mad Lads
\
-
ProgrammableNonFungible
-
Controlled Unique SPL Tokens
-
Supply = 1
-
Decimal points: 0 (indivisible, unique assets with rules)
-
Eg: NFT with enforced royalties
\
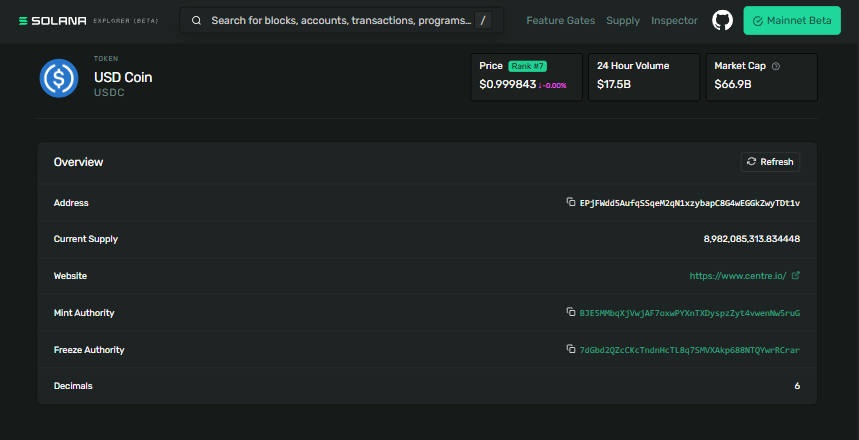
:::info ***🔍︎ ***USDC operates on Solana’s Token Program. Using the explorer, you can analyze token metrics like total supply, addresses of mint and freeze authorities, decimal precision, associated token accounts, and a log of recent transactions.
\
- SPL Token Standard: USDC is a fungible token, meaning it is interchangeable and divisible, unlike non-fungible tokens (NFTs) that are unique and indivisible.
- 1:1 USD Peg: USDC is a stablecoin issued by Circle, fully backed by cash and cash-equivalent reserves, ensuring each token is redeemable for one US dollar.
- Mint address:
EPjFWdd5AufqSSqeM2qN1xzybapC8G4wEGGkZwyTDt1v
\ :::
Create SPL Tokens
\
:::info 💻 Code: https://github.com/utkarshiniarora/spl-token/
:::
\ We will use
- Node.js
- Yarn or npm
- Solana CLI tool
- Solana Web3.js
- TypeScript and
ts-node - Metaplex Foundation Umi JS client
- Metaplex Foundation Umi default plugins bundle
- Metaplex Foundation MPL Token Metadata Library
- IPFS provider Filebase to support pinning of IPFS data
- VS Code or your choice of code editor
\
Set Up Environment
Install Solana CLI
Run the following command to install the Solana CLI tool suite:
sh -c "$(curl -sSfL https://release.anza.xyz/stable/install)" After installation, close and reopen your terminal, then verify with:
solana --version \ Set Up Devnet
Configure the Solana CLI to use the Devnet cluster for a testing environment:
solana config set --url https://api.devnet.solana.com Verify the configuration:
solana config get \ Create Project Directory
Set up a new project:
mkdir mint-token cd mint-token \ Initialize Node.js Project
yarn init --yes tsc --init Update tsconfig.json to include:
"resolveJsonModule": true, "esModuleInterop": true \ Install Dependencies:
yarn add @solana/web3.js@1 @metaplex-foundation/umi @metaplex-foundation/mpl-token-metadata @metaplex-foundation/umi-bundle-defaults bs58 \ Your package.json should now look like this:
{ "name": "mint-token", "version": "1.0.0", "main": "index.js", "license": "MIT", "dependencies": { "@metaplex-foundation/mpl-token-metadata": "^3.3.0", "@metaplex-foundation/umi": "^0.9.2", "@metaplex-foundation/umi-bundle-defaults": "^0.9.2", "@solana/web3.js": "^1.98.0", "bs58": "^6.0.0" } } \
Create a Wallet on Solana
Create wallet.ts:
- Create a file named wallet.ts
- import the essential libraries:
@solana/web3.jsprovides Solana blockchain functionsfshandles file operationsbs58encodes/decodes keys in Base58 format, a common standard for Solana- Set up a connection with the Solana Devnet (a test network) using an RPC endpoint
import { Keypair, LAMPORTS_PER_SOL, Connection } from "@solana/web3.js"; import * as fs from 'fs'; import bs58 from 'bs58'; const endpoint = "https://api.devnet.solana.com"; const solanaConnection = new Connection(endpoint); \ A new wallet is created with Keypair.generate(), which generates a random public-private key pair. The public key (your wallet address) is logged, think of it as your Solana account number
const keypair = Keypair.generate(); console.log(`Generated new KeyPair. Wallet PublicKey: `, keypair.publicKey.toString()); \ The private key (secret key) is encoded into a Base58 string for readability and security. The secret key is transformed into a JSON-friendly array of numbers, then saved to secretKey.json. This file stores your wallet’s private key securely for later use (e.g., minting tokens). The fs.writeFile call handles the save, with an error check.
const secret_array = keypair.secretKey .toString() .split(',') .map(value => Number(value)); const secret = JSON.stringify(secret_array); fs.writeFile('secretKey.json', secret, 'utf8', function(err) { if (err) throw err; console.log('SecretKey generated successfully'); }); \ An async function requests 1 SOL (in lamports) from the Devnet faucet to your new wallet’s public key. The requestAirdrop returns a transaction ID (txId), which you can view on Solana Explorer to confirm the airdrop. Errors are caught and logged if something goes wrong.
(async () => { const airdropSignature = solanaConnection.requestAirdrop( keypair.publicKey, LAMPORTS_PER_SOL, ); try { const txId = await airdropSignature; console.log(`Airdrop Transaction Id: ${txId}`); console.log(`https://explorer.solana.com/tx/${txId}?cluster=devnet`); } catch (err) { console.log(err); } })(); \ Run the script using the following command:
ts-node wallet.ts \ Add Wallet to Phantom ( optional )
Copy the private key from the console output and import it into a wallet like Phantom.
:::warning ❗ The private key gives access to your funds on Solana. This is only shared for educational purposes.
Do not share this ever.
Store it safely in .env file and add.it to .gitnore file before pushing the code to GitHub.
:::
\
Upload Metadata to IPFS
Each token has metadata that must be accessible to ensure token visibility on explorers and wallets. The metadata is uploaded to a decentralized storage solution like IPFS. Here’s how to do it with Filebase:
\ Sign Up and Set Up Filebase
- Head to https://filebase.com and create a free account. Confirm your email via the link sent to you.
- Once logged in, navigate to the Dashboard Console to create a new IPFS bucket. This is where your files will live on the decentralized network.
- Click Create Bucket
- Give it a name. Eg: Solana-ipfs
- Select Network: Ipfs ( Always public )
\ Upload Token Icon
In the Filebase Dashboard, go to the “Files” tab and click “Upload” or drag your icon file.
\ Create Metadata JSON File
Open your terminal in the project folder and create a metadata file token.json
Paste this template, customizing it for your token:
{ "name": "Takamura", "symbol": "TK", "description": "World Champion", "image": "filebase link" } \ Upload the Metadata JSON to Filebase
- Back in the Filebase Dashboard, upload
token.jsonthe same way you did the icon. - Once pinned, copy the new IPFS URL for the metadata file
\
Mint SPL Tokens
Create mint.ts:
- Create a file named mint.ts
- Import the essential libraries:
CreateUmiinitializes the Umi client.- Converts the secret key from
secretKey.jsoninto a Keypair usingcreateKeypairFromSecretKey
import { percentAmount, generateSigner, signerIdentity, createSignerFromKeypair } from '@metaplex-foundation/umi'; import { TokenStandard, createAndMint, mplTokenMetadata } from '@metaplex-foundation/mpl-token-metadata'; import { createUmi } from '@metaplex-foundation/umi-bundle-defaults'; import secret from './secretKey.json'; const umi = createUmi('https://api.devnet.solana.com'); const userWallet = umi.eddsa.createKeypairFromSecretKey(new Uint8Array(secret)); const userWalletSigner = createSignerFromKeypair(umi, userWallet); \ Metadata Definition
In this step, we define the token identity
- Set name of token: Takamura
- Add symbol of token: “TK
- uri points to an IPFS-hosted metadata file (via Filebase), containing additional details like the token image.
const metadata = { name: "Takamura", symbol: "TK", uri: "https://tart-red-catfish.myfilebase.com/ipfs/Qmf7gMX8vcCcHPH3S7AZoKK9NGfPj27H1bBgorCfe6WfKr", }; \ Token Minting
createAndMintdeploys the mint and mints 1 million tokens. Parameters include:mint: The generated mint account.authority: The wallet as the minting authorityname,symbol,uri: Metadata detailssellerFeeBasisPoints: Set to 0% (no royalties)decimals: 8, allowing 8 decimal places for divisibility (add 0 if creating Non-fungible tokens )amount: 1,000,000 tokens with 8 decimals (1,000,000_00000000)tokenOwner: The wallet owning the minted tokenstokenStandard: Fungible for a divisible token ( type NonFungible for NFT )sendAndConfirmsubmits the transaction and confirms it on the blockchain.
createAndMint(umi, { mint, authority: umi.identity, name: metadata.name, symbol: metadata.symbol, uri: metadata.uri, sellerFeeBasisPoints: percentAmount(0), decimals: 8, amount: 1000000_00000000, tokenOwner: userWallet.publicKey, tokenStandard: TokenStandard.Fungible, }).sendAnd .then(() => { console.log("Successfully minted 1 million tokens (", mint.publicKey, ")"); }) .catch((err) => { console.error("Error minting tokens:", err); }); \
Verify Deployed Tokens
Run the script with:
ts-node mint.ts \ The output generates the address of the token:
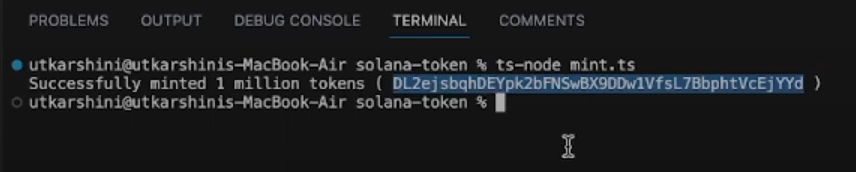
\ Verify Token On Explorer
-
Go to https://explorer.solana.com/?cluster=devnet
-
Paste the address and view your token, it should look something like this:
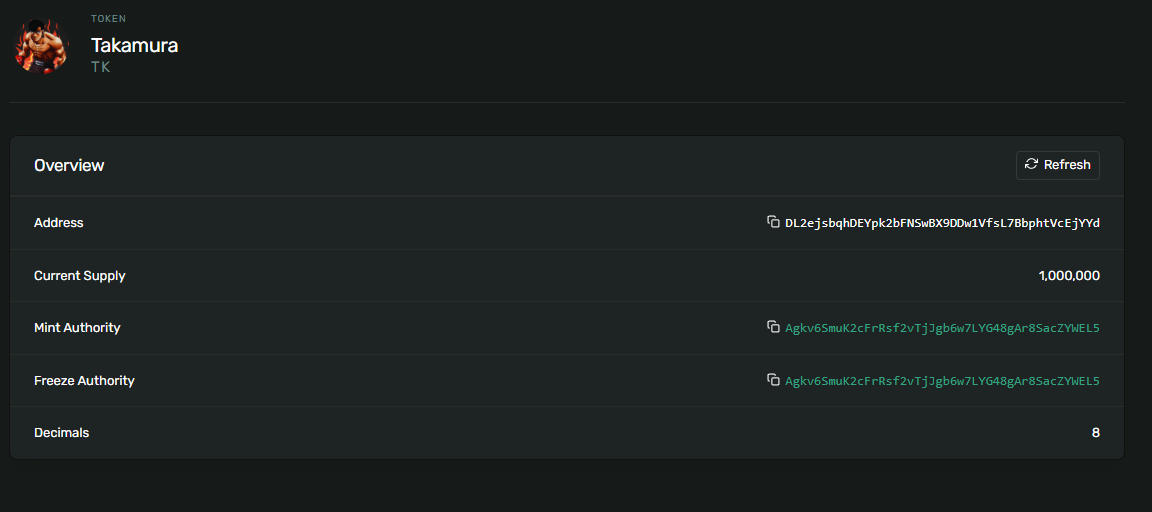
\ Or check it out here:
https://explorer.solana.com/address/DL2ejsbqhDEYpk2bFNSwBX9DDw1VfsL7BbphtVcEjYYd?cluster=devnet
\
Deploy SPL Token to Magic Eden
Once your SPL token is thoroughly tested on devnet, change the endpoint from Devnet to Mainnet and verify it on the Solana Explorer. The next step is to make it visible and tradable on marketplaces like **Magic Eden,** one of Solana’s most popular NFT and token platforms.
\
Why Magic Eden?
- Visibility: Your token appears in a trusted marketplace, accessible to thousands of traders, especially on Solana.
- Liquidity: Enables secondary market trading and broader distribution.
- Credibility: Marketplace verification boosts trust for potential holders.
\
Steps to Deploy on Magic Eden
Verify Token Metadata
- Ensure your metadata (name, symbol, description, image) is correctly uploaded to IPFS or Arweave.
- Confirm the metadata URL in your minting script is accessible and correctly formatted.
\ Create a Magic Eden Account
- Visit magiceden.io and connect your Phantom or Solflare wallet.
- Use the same wallet that holds the mint authority or owner tokens.
\ Submit Token for Verification
- Go to Magic Eden’s Creator Portal: https://creator.magiceden.io/
- Choose "Launch an NFT" (for NFTs) or "List Token Collection" (for fungible tokens).
- Fill in the following details:
- Mint Address of your SPL token
- Token symbol and metadata URL
- Project details (logo, social links, description)
\ Approval & Listing
- Magic Eden reviews your submission to ensure metadata integrity and compliance.
- Once approved, your token will appear on the marketplace, visible under your collection or token page.
\ Trading & Promotion
-
Once live, share your Magic Eden token link with your community.
-
Optionally set up a liquidity pool (e.g., on Orca) to make the token actively tradable.
\
Considerations
-
Security: Never expose private keys in production code. Use environment variables (.env) and add them to .gitignore.
-
Cost: Devnet SOL is free via airdrops, but mainnet deployments require real SOL for gas fees.
-
IPFS: Ensure your IPFS provider (e.g., Filebase) supports pinning for persistent data availability.
-
Testing: Test thoroughly on Devnet before Mainnet deployment to avoid costly errors.
\
Summary
This guide delivers a comprehensive walkthrough for creating and deploying an SPL token on the Solana blockchain using the Metaplex Token Standard and Umi client. The process includes setting up a development environment with Node.js and TypeScript, generating a wallet with airdropped SOL on Devnet, uploading metadata to IPFS via Filebase, and minting a fungible token with provided code examples. SPL tokens, built on Solana’s high-throughput infrastructure, support diverse use cases such as fungible assets and NFTs, offering a scalable and cost-efficient foundation for Web3 projects.


You May Also Like

BitGo Launches Stablecoin Minting and Redemption Service for Institutions

Best Music AI Websites For Songs And Soundtracks